
These days spinning up a cluster is extremely simple, it only takes a couple of clicks on any of the cloud providers and you will have it ready in five minutes.
But that’s not all, is it?
How do you begin with securing your Kubernetes cluster properly and not leaving everything to default settings?
Kubernetes offers lots of options for securing your cluster, but at first, it may seem that those options are hidden or near impossible to configure without significant effort.
You may have read or wanted to try out to harden your cluster by the means of network policies to restrict and fend off unwanted traffic.
If you immediately try to deploy a network policy manifest, nothing will happen. The policy will be accepted by the API but the settings from it won’t apply!
That’s because the default provider CNI’s(Container Network Interfaces) don’t offer this right out the box.
Preparing the cluster
Now the two variants here are:
- If you are just creating your cluster, you can find and enable the setting under Networking>Enable network policy at the bottom.

2. The second option is if your cluster is already running, you can enable the network policy option with:
$ gcloud container clusters update cluster-name --update-addons=NetworkPolicy=ENABLED --region region
and when the addon is enabled, issue:
$ gcloud container clusters update cluster-name --enable-network-policy --region region
Note: Beware here that enabling the network policy option also affects the nodes and may block you from issuing commands to them until the upgrade is finished.
Be patient here until the setup of the new(and better!) CNI finishes. It may take up to 15minutes.
In the meantime you can read more about the CNIs supported by Kubernetes – yes there are a lot of flavors to choose from.
As well as more about what Calico is and how it works.
https://docs.projectcalico.org/about/about-calico
Now if you check the pods in the kube-system namespace, you’ll see that there are a bunch of them from Calico.
$ kubectl get pods -n kube-system | grep calico
calico-node-64kg7                                           1/1     Running       0          9m2s
calico-node-hxjnm                                           1/1     Running       0          12m
calico-node-nsnph                                           1/1     Running       0          3m27s
calico-node-vertical-autoscaler-56b8648554-7gfv5            1/1     Running       1          8m26s
calico-typha-7b7cbd679d-dsgtw                               1/1     Running       0          8m26s
calico-typha-horizontal-autoscaler-6cb5485bdb-2hg9d         1/1     Running       0          3m3s
calico-typha-vertical-autoscaler-5ff87c657-s7gcv            1/1     Running       0          3m3s
Calico is deployed as a Daemon Set across all the worker nodes in the cluster.
After verifying you can now deploy a simple app and try out the Network Policies in Kubernetes.
Demo application
For an easier approach you can deploy and expose the application using the imperative approach:
$ kubectl run demo-app --image=paulbouwer/hello-kubernetes:1.8 --port 8080

pod/demo-app created
The pod name will be demo-app using the image paulbouwer/hello-kubernetes:1.8, with container port set to 8080.
Now expose it with a service of type Load Balancer:
$ kubectl expose pod demo-app --target-port 8080 --port 80 --type LoadBalancer

service/demo-app exposed
You can now check on both the objects with:
$ kubectl get pod,service
NAME             READY    STATUS    RESTARTS   AGE
pod/demo-app      1/1     Running       0      27s
NAME TYPE CLUSTER-IP EXTERNAL-IP PORT(S) AGE
service/demo-app LoadBalancer 10.92.11.51 35.205.37.114 80:30181/TCP 2m28s
Going to the External IP of the load balancer will open the webpage from the demo app.
Setting up Network Policies
There are two approaches to setting up the network policies, much similar to what ACLs(Access Control Lists) are to networks.
You can either set an implicit deny for all connections or allow everything and block when necessary.
You can try setting a default deny-all setting at first, and then continue by allowing only the necessary traffic for the pod.
Create a yaml and apply the settings below:
kind: NetworkPolicy
apiVersion: networking.k8s.io/v1
metadata:
  name: default-deny-all
  namespace: default
spec:
  podSelector: {}
  ingress: []
Now try accessing the demo app again.
Huh, it doesn’t work?
Let’s explain a bit what the policy does. By being deployed to the default namespace it only affects the pods that reside there.
- Under the spec.podSelector section without providing a specific pod and leaving it empty this policy applies to ALL pods in the namespace.
- The same approach is for the spec.ingress, there are no explicit rules defined so the policy applies to everything.
You can describe the policy.
$ kubectl describe networkpolicy default-deny-all
Now create a second network policy to allow the traffic to the pod – and restore its access to the webpage.
kind: NetworkPolicy
apiVersion: networking.k8s.io/v1
metadata:
  name: allow-to-demo
  namespace: default
spec:
  podSelector:
    matchLabels:
      run: demo-app
  ingress:
  - from:
    ports:
    - protocol: TCP
      port: 8080
In the first part, you are defining (through the label selector) which pods are going to be affected by the policy.
And in the ingress section, you are allowing the traffic destined to the pod, going to port 8080. Which was the container port on the demo application.
Try refreshing the page. The connection should be now restored.
The best way to view what the policy allows or denies is by using the describe option.
$ kubectl describe networkpolicy allow-to-demo
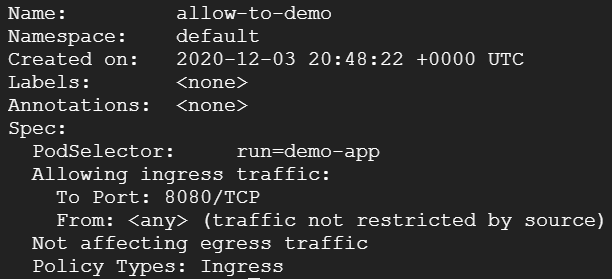
The granularity options for the network policies are excellent, you can filter by namespace, ingress, or egress traffic, allowing per IP or CIDR range, per protocol(TCP/UDP), ports, etc…
Denying by external IP addresses
Another common example of restricting traffic is by external or client IP address.
If there are some unusual requests from an IP you can block it through the network policy.
But before continuing, you must first amend the service for the load balancer in order for the client IP addresses to be preserved. Otherwise, when a request enters the cluster, the IP addresses are translated and stripped of their source IP.
This is done by setting the externalTrafficPolicy to Local. The other-default option is Cluster.
If you want to read more about what this setting does and what are it’s caveats you can visit this link https://kubernetes.io/docs/tasks/access-application-cluster/create-external-load-balancer/#preserving-the-client-source-ip
Now, change the traffic policy of the service with:
$ kubectl edit svc demo-app
Under spec, from Cluster to Local.
Open the LB address again and view the logs of the demo-app. You should see your IP address.
$ kubectl logs -f demo-app
In order to test, you can block your own IP address.
Amend the network policy and add another section that the request needs to pass in order to get forwarded. This option is to block or allow per IP range.
kind: NetworkPolicy
apiVersion: networking.k8s.io/v1
metadata:
  name: allow-to-demo
  namespace: default
spec:
  podSelector:
    matchLabels:
      run: demo-app
  ingress:
  - from:
    - ipBlock:
        cidr: 0.0.0.0/0
        except:
        - 11.11.11.11/32
    ports:
    - protocol: TCP
      port: 8080
Replace 11.11.11.11/32 with your own address.
You are first setting the allowed range of IP addresses. The addresses in the except block are ignored thus being blocked from accessing.
The 0.0.0.0/0 is a saying of ANY address with ANY subnet mask that matches, at the except part add your address with /32 subnet mask.
The /32 subnet mask has a range of only a single IP address. So you effectively block only that address.
Reload the page and if the policy is correctly configured the webpage should fail to load.
If that’s the case you have successfully configured a network policy and restricted traffic! Well done.
For further experimenting, an excellent source of network policy examples can be found here