So, your workloads started to hit the ceiling with requests and the autoscaling is going through the roof. It’s that time, time to upgrade.
Here I will describe how to upgrade the whole node pool to a different instance or machine type with more CPU and RAM.
Upgrading is… inconvenient, it doesn’t matter if it’s a simple 5min fix to change an image or upgrade something else. There is still that teeny tiny negative thought that something may or can go wrong during the upgrade.
Nonetheless, working on the cloud has it’s perks and the chances are significantly lower of something going sideways. We still strive for better reliability, security, and uptime and so do the cloud providers with their services.
Let’s start.
Here we have our K8s cluster up and running with its three worker nodes, but doing a ‘top nodes’ shows us that they are near their memory limit, so let’s begin with the upgrade and swapping out those nodes.
NAME                                                CPU(cores)   CPU%   MEMORY(bytes)   MEMORY%
gke-kubernetes-cluster-default-pool-0a3ad3e1-b93k   54m          5%     954Mi           82%
gke-kubernetes-cluster-default-pool-0a3ad3e1-hgrx   70m          7%     917Mi           79%
gke-kubernetes-cluster-default-pool-0a3ad3e1-tzv6   121m         12%    1136Mi          98%
Now before starting you’ll need to choose the new instance type, and how much nodes would you like.
(I’m doing this on GKE, but it all similar on Azure or AWS)
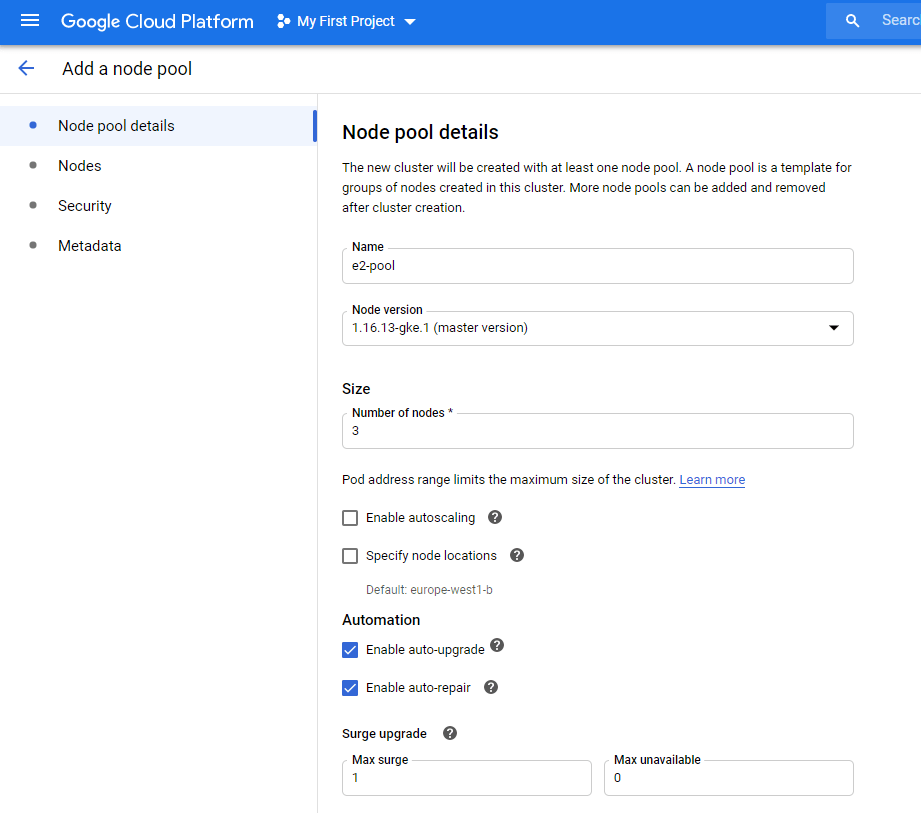
Go to Kubernetes Engine>Cluster>Your cluster and click add node pool from the top bar.
I’m gonna name the new pool “e2-pool”, as E2 are the newer instances that we are gonna upgrade to.
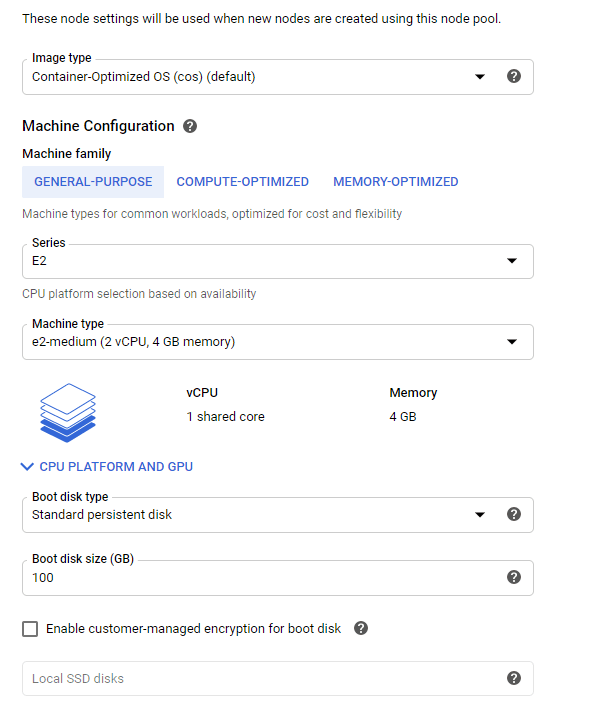
I’m choosing E2-medium which have 2 CPU’s and 4GB of RAM per node, that should be sufficent for my testing purposes.
After waiting a bit, the new pool is up and running:
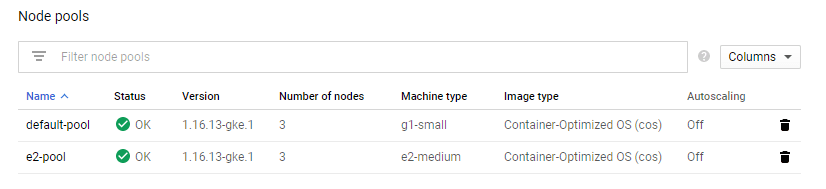
Issuing ‘get nodes’ or ‘top nodes’ will show us that the new pool is registered:
NAME                                                CPU(cores)   CPU%   MEMORY(bytes)   MEMORY%
gke-kubernetes-cluster-default-pool-0a3ad3e1-b93k   63m          6%     970Mi           83%
gke-kubernetes-cluster-default-pool-0a3ad3e1-hgrx   63m          6%     928Mi           80%
gke-kubernetes-cluster-default-pool-0a3ad3e1-tzv6   102m         10%    1156Mi          99%
gke-kubernetes-cluster-e2-pool-7fd36867-033p        56m          5%     615Mi           21%
gke-kubernetes-cluster-e2-pool-7fd36867-ktcb        57m          6%     584Mi           20%
gke-kubernetes-cluster-e2-pool-7fd36867-p9tv        57m          6%     589Mi           20%
Halfway there, now we will need to mark the current node pool as unscheduleable and evict the pods.
From the old pool, to mark the nodes as unchedulable or what is know as cordoning issue:
$ kubectl cordon node-name
In my case
$ kubectl cordon gke-kubernetes-cluster-default-pool-0a3ad3e1-b93k
---
node/gke-kubernetes-cluster-default-pool-0a3ad3e1-b93k cordoned
To check if the cordoning is successful you’ll see the node marked with “SchedulingDisabled” under status.
NAME                                                STATUS                     ROLES    AGE   VERSION
gke-kubernetes-cluster-default-pool-0a3ad3e1-b93k   Ready,SchedulingDisabled   <none>   66m   v1.16.13-gke.1
gke-kubernetes-cluster-default-pool-0a3ad3e1-hgrx   Ready                      <none>   66m   v1.16.13-gke.1
gke-kubernetes-cluster-default-pool-0a3ad3e1-tzv6   Ready                      <none>   66m   v1.16.13-gke.1
gke-kubernetes-cluster-e2-pool-7fd36867-033p        Ready                      <none>   29m   v1.16.13-gke.1
gke-kubernetes-cluster-e2-pool-7fd36867-ktcb        Ready                      <none>   29m   v1.16.13-gke.1
gke-kubernetes-cluster-e2-pool-7fd36867-p9tv        Ready                      <none>   29m   v1.16.13-gke.1
Also if you do ‘describe’ on the node, you’ll find that the node has been tainted and marked as unschedulable. Pay attention to the Taints and Unschedulable flags.

Continue on the other nodes. Also, make note that this is only tainting the nodes so no new pods will be scheduled to them, the existing running pods will stay! For that, we will need to drain the nodes.
NAME STATUS
gke-kubernetes-cluster-default-pool-0a3ad3e1-b93k Ready,SchedulingDisabled
gke-kubernetes-cluster-default-pool-0a3ad3e1-hgrx Ready,SchedulingDisabled
gke-kubernetes-cluster-default-pool-0a3ad3e1-tzv6 Ready,SchedulingDisabled
gke-kubernetes-cluster-e2-pool-7fd36867-033p Ready
gke-kubernetes-cluster-e2-pool-7fd36867-ktcb Ready
gke-kubernetes-cluster-e2-pool-7fd36867-p9tv Ready
After all the nodes have been cordoned, now we will start draining the nodes in order to evict the pods and force them to migrate to the new node pool.
Start with the first node, the command will be:
$ kubectl drain gke-kubernetes-cluster-default-pool-0a3ad3e1-b93k --ignore-daemonsets
Note: Since daemon set managed pods will be deployed to every node, you will get an error that the operator cannot evict those pods. The argument to add is in bold and self-explanatory. Those pods will be ignored and continue to run, to which they make no difference since the new node pool will be prepared, and the old one can be safely deleted.
Here is the output, note the evictions:
evicting pod default/api-gateway-0
evicting pod kube-system/event-exporter-gke-59b99fdd9c-dslhp
evicting pod kube-system/fluentd-gke-scaler-cd4d654d7-glk9d
evicting pod kube-system/kube-dns-7c976ddbdb-4xhqj
pod/api-gateway-0 evicted
pod/fluentd-gke-scaler-cd4d654d7-glk9d evicted
pod/kube-dns-7c976ddbdb-4xhqj evicted
pod/event-exporter-gke-59b99fdd9c-dslhp evicted
node/gke-kubernetes-cluster-default-pool-0a3ad3e1-b93k evicted
Now do describe on the same node and you will find that it doesn’t have any pods scheduled to it(apart from the monitoring ones, from the daemon set).

Now if we do describe on any of the new nodes, we can see that our pods have migrated:
$ kubectl describe node gke-kubernetes-cluster-e2-pool-7fd36867-ktcb
Continue draining all the old nodes, and check if the new ones have the pods from your namespace.
Running ‘get pods’ with wide output will show us also on which node they reside in:

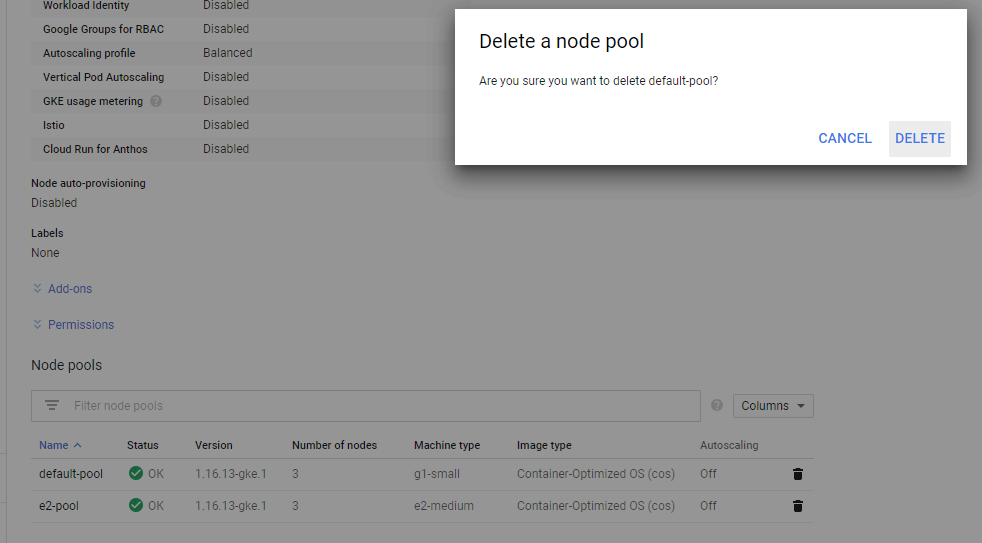
Now we are left to delete the old pool.
$ kubectl get nodes
---
NAME STATUS ROLES AGE VERSION
gke-kubernetes-cluster-e2-pool-7fd36867-033p Ready 76m v1.16.13-gke.1
gke-kubernetes-cluster-e2-pool-7fd36867-ktcb Ready 76m v1.16.13-gke.1
gke-kubernetes-cluster-e2-pool-7fd36867-p9tv Ready 76m v1.16.13-gke.1
That’s it. You’ve successfully managed to migrate the workloads to a new pool with zero downtime and no pods lost :)!